learn ‘how to make stickers on Cricut‘, then you have come to the right place. Stickers are loved by everyone, whether you’re a child or an adult. You do not need a printer to make custom stickers. You can create stickers at home using the crafting machine and some supplies and tools.
Stickers may look like ordinary sheets of paper, but they are a great way to personalize journals or gifts. Whether you are a Cricut user or a beginner, if you have a crafting machine and Cricut Design Space app downloaded to your device, you can make stickers in any shape, color, or size you can imagine.
There are three general types of stickers you can create with your Cricut cutting machine: written labels, vinyl decals, and Print Then Cut stickers. In this blog, you will learn about Print Then Cut stickers.
What Materials Do You Need for Your Project?
Before starting the process of how to make stickers on Cricut the first step is gathering all of the supplies and equipment needed for sticker making.
- Cricut Explore, Explore Air 2, and Maker 3
- Design Space
- LightGrip cutting mat
- Inkjet printer
- StandardGrip mat
- Sticker paper, printable vinyl sticker paper
Making Print Then Cut stickers is a great way to personalize gifts, decorate water bottles, or add stickers to scrapbooks and journals. Creating stickers is fun and easy, but to get started, you need to gather the materials mentioned above and then follow the steps below to proceed with the sticker-making.
How to Make Stickers on Cricut: 6 Simple Steps
Here are the steps you will need to follow for creating stickers on your crafting machine. So, let’s get started right away.
Step 1: Calibrate Your Machine for Print Then Cut

Calibrating your machine can sound optional, but this is the important part of making stickers with Cricut. In the Cricut Design Space app, choose Calibration from the menu, and then choose Print Then Cut. The software will prompt you to print a test sheet and load it into your machine. Tip: If possible, try to use a lightGrip machine mat.
Step 2: Add a Printable Image to Your Canvas
Now, within the Cricut Design Space Software, you can add multiple images to your canvas to make custom stickers. Or you can upload your SVG file. Once you have placed the images on your canvas, select Print Then Cut under the Operation menu and change the design from a Basic cut to a printable design.
Step 3: Format Images With Offset Feature
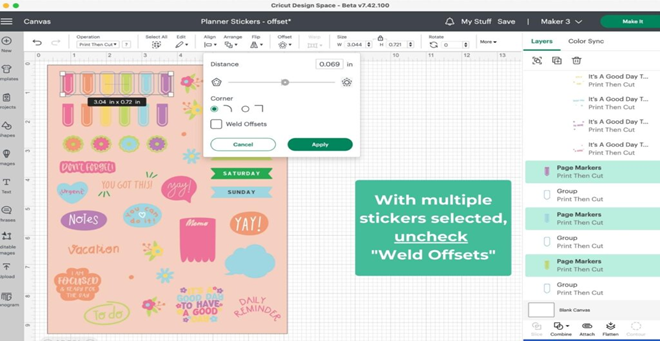
When you are done creating your stickers, you can add a finishing touch. To do this, you need to create a white border around your images. This creates a decorative outline called an offset, adding dimension to your sticker. Choose the design/ image that you want to offset, and then click the Offset option in the toolbar. When you are done selecting the offset feature by default, it can show you dark gray, which you may need to change to white.
Step 4: Attach the Images
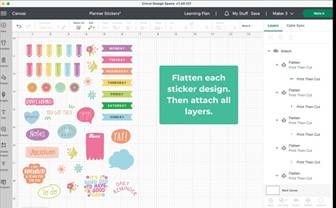
Once you are done formatting your stickers, select each with its layers in the layers panel and click Flatten. When you flatten the images, make them into one layer, and to keep your project in order, select all photos and click on the Attach option.
After flattening the design, you cannot change the colors. But you can always Unflatten the images and make changes later.
Step 5: Print Sticker Sheet
Now, you’ve reached the best part of sticker making. Once you click the Make It button, you are ready to print your design. Click on Use System Dialog, and a preview box will appear where you can fix your print settings. Printer settings vary depending on your model, but select the highest-quality print setting if possible. Make sure the sticker paper is compatible with the printer and the paper you have chosen.
Step 6: Cut the Image Using Your Machine
This is the last step of ‘how to make stickers on Cricut‘. Firstly, when your stickers are printed, put them on the Cricut mat, then choose your material settings. After that, load your cutting mat and press start to cut using the standard fine-point blade. Remember to change your custom settings to Sticker paper. They have clear white options, so choose accordingly. When the stickers are done cutting, remove them from the mat, and it is ready to use.
Summary
Making stickers with Cricut is a very fun and creative process. Using your machine, you can make different kinds of stickers in different colors for your journals, scrapbooks, or for your gift hampers. It is a great way to get kids involved in a fun and creative activity. You can create stickers for your journal, notebook, or customized gifts. Not only is it a creative process, but it is also a great way to add a unique touch to your belongings.
In this blog, you explore ‘how to make stickers on Cricut’, and now you can decide which kind of stickers you want to make.