If you are new to Cricut Design Space, you may wonder how to weld texts and images in the Cricut app. The Weld tool is one of the most important features, which allows you to join two or more shapes into a single layer that makes them perfect for your project. This write-up will guide you on how to Weld in Cricut Design Space.
Whether you are creating personalized items, home decor, cards, tote bags, stickers, or other projects, welding will help you take your crafting skills to the next level. So, let’s get started and explore.
What Is a Weld Tool, and Why Do You Need It?
The Weld tool in Cricut Design Space joins multiple images, words, or shapes into a single-layer object. This is useful when you have to simplify your design, keep the letters of a word connected, or create a design. When you weld shapes in the app, the overlapping cut lines disappear, becoming one seamless shape. It is similar to welding metal pieces, where they are melted and joined to form a single unit.
Once you understand these tools, the design software will be much easier and more fun. You will be able to use Cricut Design Space more confidently and make your designs more easily and quickly. Now, proceed to learn ‘how to weld in Cricut Design Space‘.
Where Is the Weld Tool Located in Design Space?

To locate the Weld tool in the app, open the app and then look for the icon with a connected circle and square on the desktop computer (Mac and Windows). The Weld tool is found at the bottom left corner of the Layers Panel, while on mobile devices (iOS and Android), it is found under the Actions menu. You will need to scroll a bit to the right to see the icon.
How to Weld in Cricut Design Space?
Welding is a feature in the Cricut app that is useful for your DIY projects, and you can use it for welding text or images. With the below steps, you can easily learn how to use this feature for images and texts.
Welding Images
To use the Weld tool in the application, follow the below simple steps:
- On your empty canvas, arrange two or more images so that they overlap each other.
- A gray bounding box will appear around your images, and the selected layers will be shown in the Layers panel.
- Once you choose the layers, the Weld button will turn black and become active.
- If you are on a computer, the Weld button is located at the bottom left of the Layers panel, or if you are using a mobile device, it is in the Actions menu at the bottom of the window.
- Clicking the Weld button merges the images into a new image, and the layer names change, resulting in a “Weld Result.”
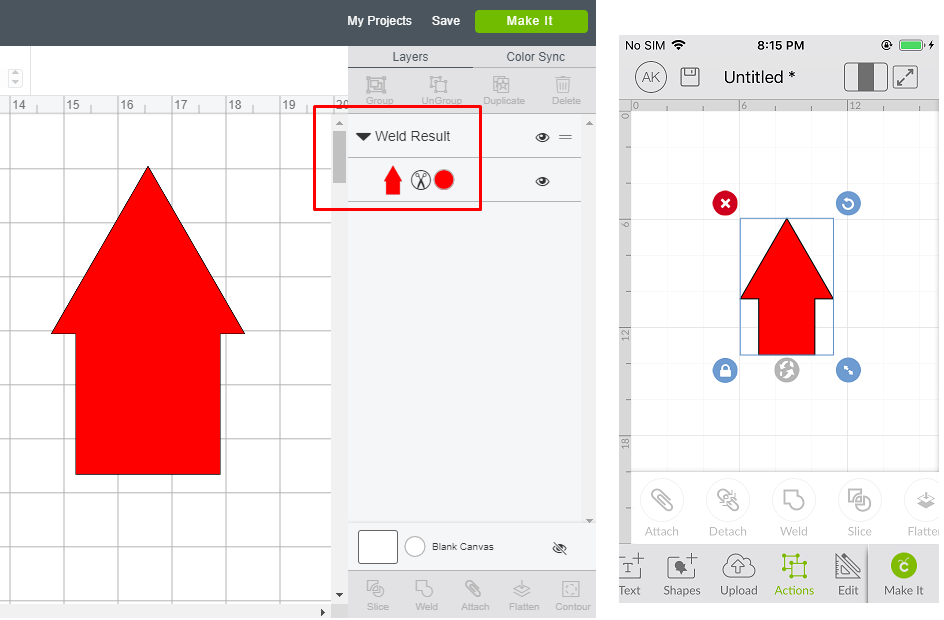
- You will know your images are welded when they change to the same color, and the new images appear in the Layers panel. Now, you can move or edit this layer if you need to make any changes to the images.
This easy process can help you create more intricate and professional designs with your Cricut cutting machine, giving you more creative freedom in your DIY projects.
Welding Text
In these steps, you will use Weld to connect letters in a cursive font:
- First, click on the Text box, and then type a word in script font.
- Try decreasing the letter spacing if the letters look too far away from each other.
- If the letters still don’t touch, you can adjust them manually. Hit the Advanced drop-down menu, click on Ungroup to letters, and move the individual letters until they overlap.
- After that, choose all of the letters and click the Weld button.
Tips and Tricks for Working With a Weld Tool
Weld is a high-powered and useful tool, but when using it, you have to remember these few tips and tricks to keep in mind:
- Firstly, remember that welding works with two or more layers. If only a single layer is selected, the Weld icon will turn gray, making it unusable.
- The Weld tool is designed to merge overlapping images so they can be cut as a single piece.
- Also, Weld can be applied to both Grouped and Attached images. However, if you weld a group of pictures with a hidden layer, this layer will be excluded from the Weld Result layer.
- The Weld Result layer has the properties of the bottom layer. In other words, it will become the bottommost layer in the app, which means the result will be based on the bottom layer.
Additionally, Weld can be applied to both Grouped and Attached images; however, if you weld a group of pictures with a hidden layer, that hidden layer will be excluded and not included in the Weld Result layer.
Final Words
After reading this guide on how to weld in Cricut Design Space, you will understand how to use it effectively. The Weld tool can help you create unique and professional-looking craft projects by combining multiple shapes or letters into one single shape. Whether you are a beginner or an experienced crafter, this tool is easy to use and can help take your projects to the next level.
So, start exploring with your craft and Weld tool today and see what beautiful projects and designs you can create with your crafting machine.
FAQs
Why Is the Weld Button Grayed Out?
If the Weld button is grayed out, the Weld option is not available to use with your current selection. Or you have not made a selection. To fix it, make sure that you have selected at least two visible layers. It will be grayed out if the objects are not overlapping or intersecting. If the button is still grayed out, you can try saving your work, restarting the application, and reopening it.
What Is the Key Difference Between Attach and Weld in Cricut?
In short, using the Attach tool ensures that the arrangement of your shapes remains unchanged during cutting, although they remain separate pieces. It is useful when you want to tell the Cricut to cut and put something exactly where you intend it to. On the other hand, using Weld permanently joins two or more different objects into a single image. This removes any overlapping cut lines and simplifies the design.
Can You Undo a Weld in Design Space?
Once you weld the design, it cannot be undone. Unfortunately, Cricut Design Space does not provide any other feature to unwind it. After you have done this, you will have to click the Undo button or press Control/Command + Z on your keyboard. If you have closed the project and reopened it, you won’t be able to undo the weld.